Hike and chill: here’s my list of 5 favorite spots for a quick hike near Manila + some tips for your first time
Just before I published this, I had a small talk with my colleague about his day hike that coming weekend. It was his first time mountain climbing and honestly, I find it quite funny hearing stories like those. Not because I think I am a big time hiker, but I laugh at myself because I felt the same exact excitement back when I was tagged to join a day hike. I mean, it’s kinda cute.
I never told anyone which my mother mountain was, but I am very vocal that I did only minor hikes and never at least once a major. It’s just nice seeing my past self in first time hikers, and if ever I would be joining or having a hike again, I’m sure I’d feel exactly the same as I did before.
Anyway, I hope this helps: I’ve collated some tips for first-time hikes that I learned from experience. I know some of the items are a bit cliche and “common sense”, but if I included them in my “a-must” list, it means it’s true and really (I mean REALLY!) important.
I travel a lot, and one of my biggest problems is I quickly get sunburns even along my ride to somewhere. But you know what, I finallly found my skin care routine best for after-summer vacays. Here’s how I take care of my sun-burnt skin. Aside from sunburns and an empty wallet, what else do I get from traveling, by the way?
Moving on, another challenge is thinking of how can you make your story interesting enough to get people to listen or read your page. Photos! Apparently people love viewing photos more than reading detailed stories, so no matter how much information you have you still have to own a technique on editing your photos. Here’s mine.
Tips and tricks for your first time hike
1. Train yourself before the hike |
|
|
Many of you would think “ano ba, minor day hike lang, training pa?!” You need to understand that we don’t have the same level of capability, pace, and well, technically everything. Hiking is not just a walk in the park. Hiking doesn’t only require courage, but strength and balance. Okay, so you’re either a beginner or haven’t been out hiking for a little while already. One great way to re-enter the hobby (or habit?) is to enjoy a day hike. But it’s important that you let your body know first that you’re going to be pushing it beyond your regular everyday walk. Take a longer walk than your usual for at least every other day. Make sure you do a little cardio and wake your heart up. |
2. It’s not bad if you start small |
|
|
Here’s a breaking news: there is no official “hiking season”. Yes, I’ve heard a lot of “when is the best time to hike?” and the answer is uh-uh, there is no best time to hike. Well, technically, it really depends on where are you going to do the trekking. Some place are okay to hike all-year round, some trails are only safe during the summer, while some mountains would give you great experiences on rainy seasons. That’s just one factor to be considered when choosing your trail. Some of my friends would get embarrassed sharing their first hiking experience because it was not as adventurous as other people expects. Later on this post I shared 5 of my favorite spots for hiking which I think you’ll appreciate, too! Our minds should be always open why people choose what. Every decision is critical, especially if you’re not yet familiar with it. If you are a first-time hiker, it’s not bad or embarrassing if you start with a level one hike. It’s actually a good start, to be honest. Clearing all the level before you level up. |
3. Start early: pack light |
|
|
One thing I noticed with my more experienced hiking friends is that they are not sharing or teaching beginners what everything they know about packing your trekking stuff. I assume it was because it somehow depends on the person what he/she really needs or how they prefer to pack. Still, there are these basic needs we all have to carry because, here’s an honest opinion: not all things are meant to be shared. Don’t get me wrong, that’s why it’s best to have a buddy – to have someone there in case you need something. We can always expect and ask for help, but it is always best if we’re all ready with these basic equipment, such as first aid kits. All the stuff you “need” to bring, how to pack light? One simple answer: bring only those that you “need”, not those you just want. You’ll realize this sooner, or maybe on your second or third hike, but doesn’t hurt to do the same the first time. |
4. Wear the right outfit |
|
|
It is common (and totally understandable) that when we’re going on an adventure for the first time, we get ready from materials up to outfits. What is Instagram for, if you don’t have the best OOTD, right? I hate to break it t you, but you actually don’t have to buy new hiking outfits. Your old leggings and lose shirt will do the trick. But whatever, go shop if you insist, as long as you will be wearing comfortable clothes because remember, you are HIKING! The shoes, though, is very much important. You don’t want to go home with a wrecked pair of slip-ons. DO NOT use your sneakers for hiking! Any kind of sneakers, even that most expensive and most quality one. Wear either hiking or trekking shoes or trekking sandals. DO NOT wear house sleepers! (Saying this because I saw one girl literally displaying her Havaianas at some rocky mountain. But honestly, I did some rock climbing with a cute pair of Banana Peel myself and it was fun!) |
5. Keep yourself hydrated |
|
|
This may sound “common sense” but this is also the most important part of hiking – hydrate yourself, and hydrate yourself properly. How much water do you need to bring? It actually depends – some say 2 liters are enough, some say 5 liters is the ideal. You know for yourself if how much you feel thirsty or dry. (If not, try working out and from there you’ll know.) Personally, I bring 2 liters of drinking water for a day hike. Considering how much I need, how much I can carry, and if there are water sources along the trail. How frequent should you hydrate yourself? The ideal is a sip for at least every hour. Yes, a sip. You only need to wet your mouth if it feels dry. Do not drink too much water during the trek or you’ll feel heavier and lose air. However, again, it depends on how much you can tolerate. |
6. Protect your skin |
|
|
You may feel lucky you seen to get unaffected by sunburn, but you’re still human with a delate skin, so better take care of it before it’s too late. I know people who just do whatever they want to and stay under the sun because, apparently, they don’t get affected by sunburns or similar effects made by the sun. While I’m annoyed how lucky they are, I also am worried how much damage it brings to their skin without even noticing it. The best approach, still, is to apply sunblock (better if organic or eco-friendly). But most of the beginners are advised to wear long sleeves or sun-protect sleeves instead. At elast on my experience.
Related post: How I take care of my sun-burnt skin
|
7. Let somebody else know where you’re going |
|
|
Climbing a mountain, regardless of level, is dangerous. Not only because there are hidden cliffs, but you don’t know what kind of insect may harm you. (Plus, I think, traveling in general is kind of scary as well.) Most mountains do not have network signal/reception so you cannot ping a friend real-time in case of an emergency. Safety tip? Bring your first aid kit, register your real, full name on the tourism log book, and inform anyone from your family or close friends where you’re going. |
8. Do a quick research about everything local |
|
| Whenever I go out of town – hiking or not – I research first things about where I’m going. How’s the transpo, estimated budget, what to do, where to eat, local language (best if you know the basics), culture or local practice (especially when out of the country), even IG photos from other travelers. Why it’s important? It gives familiarity to a place and it’s people. Once you already are familiar, it gets much easier to adjust how you interact to local people and it gives you even more time to explore the place. You don’t want to waste hours just waiting for a ride along a remote area. |

1. Mt. Daraitan and Tinapak River |
|||
|
Many experienced hikers would say Mt. Daraitan is not for the adventure seeking individuals, but with the level of four out of nine, it’s already a tough challenge for first time hikers or beginners. Most parts of the trail are straight ascent. It may feel very steep for a first-timer, but along the trail there are either hand rails or ropes to hold on to, proof that the mountain is well-maintained. As of writing, hikers say most parts of the other trail are already cemented, anyway. Mt. Daraitan has become one of my favorites because of Tinipak River. You can trek directly to the river side without traversing to the mountain, actually. But I just loved how it made me feel soooo refreshed after the hike.
|
2. Laiban Trio (Mt. Lubo, Mt. Ngusong Kabayo, Tangwa Peak) |
|||
|
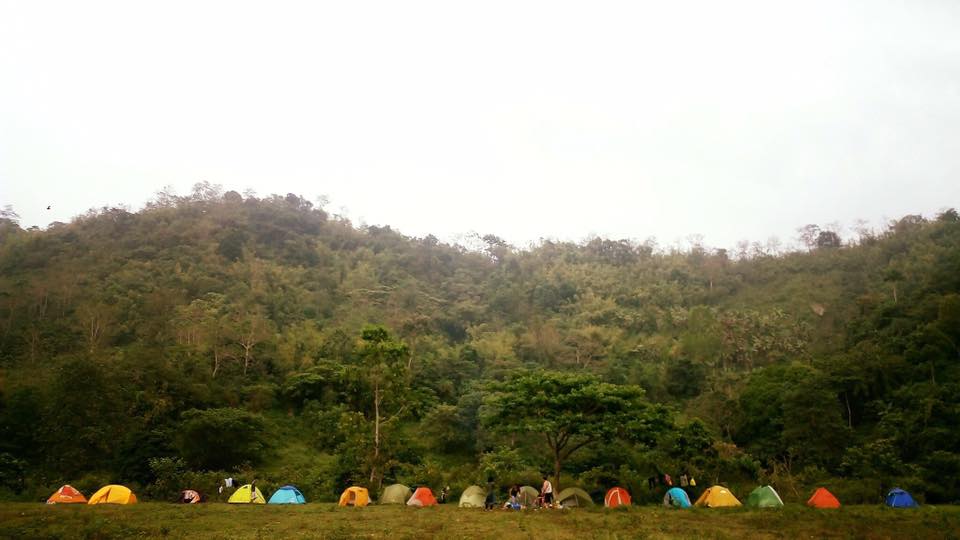
Total disclaimer: “Laiban Trio” isn’t the official name of the trail. I just named it that way, and I’m not sure if anyone else used it before of after me. Some call it Laiban Trilogy, or Laiban Quatro. The circuit is a long trek. Some parts are easy peasy, and some are too steep even for me. But the end-to-end trail is a beaut. Cliffs, fogs, mountain range views. All the effort and loss of air to breathe (lol) on every stop is worth it. Aside from the waterfalls along the trail, the beautiful rock formations, the assault to steep and steeper trails, I also loved the part where we pitched our tents. We camped on the plains right beside the mountain range. During the night, you’d literally hear cows mooing, horses neighing, and other farm animals within the area. Definitely one of the sounds I’d love to hear while taking a break from the cities.
|

3. Treasure Mountain |
|||
|
Effortless trekking to a beautiful view of the sea of clouds? Treasure Mountain is one (if not the only) of the easiest trek where you can literally take advantage of the “sea of clouds” picturesque. It’s too easy I walked up to the top while I was on my fourth month pregnancy! Why it became one of my faves? ICYM: I had a little trek while I was pregnant. I know it’s scary to do such when you are having a baby, however it became my “goodbye for now” hike since I never climbed other mountains yet (as of writing) since I gave birth.
|

4. Mt. Romelo |
|||
If you’re up for a little mud challenge, climb Mt. Romelo at the start of the rainy season. You gotta be careful, as the trail is kind of both slippery and sticky. What to love about Mt. Romelo? Of course, the experience, and the smell! You’ll get what I mean.
|

5. Mt. Bira Bira |
|||
I have very personal memorable experience at Mt. Bira Bira I can’t share online. But if we’re friends, I’ll consider opening this chapter of my book. But honestly, this is the reason why this mountain became one of my favorites. It’s not a happy memory, but an important realization came in to me on my second trek to this place.
|